
How to Integrate Salesforce with LinkedIn
- Tejkaran Singh

- Sep 20, 2021
- 4 min read
Updated: Nov 11, 2021

Sales teams can now use the mighty power of LinkedIn Sales Navigator – where they're already measuring other sales activities — and Salesforce, thanks to the LinkedIn and Salesforce integration.
You can do the following with this unification:
Choose buyers and businesses that are a good fit for your goods and services.
Use the information in the buyer's social profile to determine their worth.
For your outreach, provide buyers with individualized information.
Ensure that every sales outreach is individualized and correctly recorded in Salesforce to save reps time.
There are various ways of iterating Salesforce with LinkedIn like
LinkedIn integration with AppExchange
Third-party integrations
Native APIs
LinkedIn's Sales Guide for Salesforce will provide your sales reps with a smooth sales prospecting experience. Reps may now immediately migrate any accounts, contacts, or prospect credentials that your team is currently working on from Sales Navigator. Your sales associates may log Sales Navigator activity directly into Salesforce thanks to the AppExchange connector.
InMail Messages and Notes are factored in Salesforce.
CRM Contact and Account Records from Salesforce Open Opportunities are automatically imported into Sales Navigator for more tailored communication throughout an operational transaction cycle.
Deploying a Salesforce CRM Widget that allows your reps to view LinkedIn information directly in the Lead and Communication Record.
Here are some prerequisites for the successful integration of Salesforce and LinkedIn
Salesforce
On one of the following editions, you'll require full admin access:
Salesforce editions include Enterprise, Performance, Unlimited, and Developer.
API Access is required for Salesforce Professional Edition. (An extra price may be required; please contact Salesforce for further details.)
LinkedIn Sales Navigator
You need permission to one of these to view and test all functions of Sales Navigator integrated profile in Salesforce:
Sales Navigator Team Member seat or Administrator Plus Team Member access for LinkedIn Sales Navigator Team or Sales Navigator Enterprise
Installation
Activate My Domain
To set up your domain, follow these steps:
1. To get started, go to your Salesforce homepage.
2. In the top left corner of the screen, click Setup and type My Domain in the Quick Find search box.
3. Go to Company Settings and select My Domain.
4. In the Choose Your Domain Name section, type the name you want for your domain and click Check Availability.
5. Click Register Domain if your domain is available. Wait for the domain name to go live.
Note: An email will be sent to your successful registration.
6. To test your domain, click Log in. Your email will receive emails from support@salesforce.com. To log in and test your domain, click the link in the email.
7. Click Open in the Navigate to this page pop-up box that displays.
8. Return to the My Domain settings and click Deploy to Users once you've finished testing.
9. Click OK in the pop-up window that displays.
Deploy LinkedIn Sales Navigator
To get the LinkedIn Sales Navigator app, follow these steps:
1. In the Quick Find search box, type LinkedIn Sales Navigator.
You have two terrific options for enabling important CRM functionalities, depending on business needs:
The AppExchange Package and Native Integration
We recommend starting with the AppExchange Package, which gives you access to all capabilities, including Data Validation and Salesforce Classic support.
The landing page for installing AppExchange Packages is shown in the image below.

The Native Integration installation landing page is shown in the image below.

Note: You can gradually activate the Native Integration if you need recourse to the Salesforce High-Velocity Sales Integration. Please see the table below for a complete feature comparison:

2. Locate the LinkedIn Sales Navigator AppExchange Package option and click Install to proceed to update the AppExchange Program.

3. Select Get it Now in the pop-up box that displays. For authentication purposes, you may be asked to connect to your AppExchange account.
4. Choose Download Here under Install in This Organization.
5. Read the terms and conditions and agree to them before clicking Confirm and Install.
6. Define who has access to which profiles and users:
Install for All Users is a good option if you don't want to limit any users.
Select Install for Specific Profiles if you want to limit access to specific profiles and users for whom you've already provisioned Sales Navigator Team seats or licenses.

7. Press the Install button.
8. Based on your experience, complete one of the following steps:
Proceed to the next phase if you see an Installation Complete screen.
If you see a Processing screen, you'll get an email when the installation is finished, and then you can move on to the next phase.
9. Switch the Sales Navigator Integration button to On to gradually activate the Native Integration (without access to Data Validation or SFDC Classic Embedded Profile components). Then, to configure Lightning Page Layouts and enable the integration with High-Velocity Sales, follow the rest of the procedures on this page.

Configuration
Customization of the entire app, including data validation settings (AppExchange Package Only)
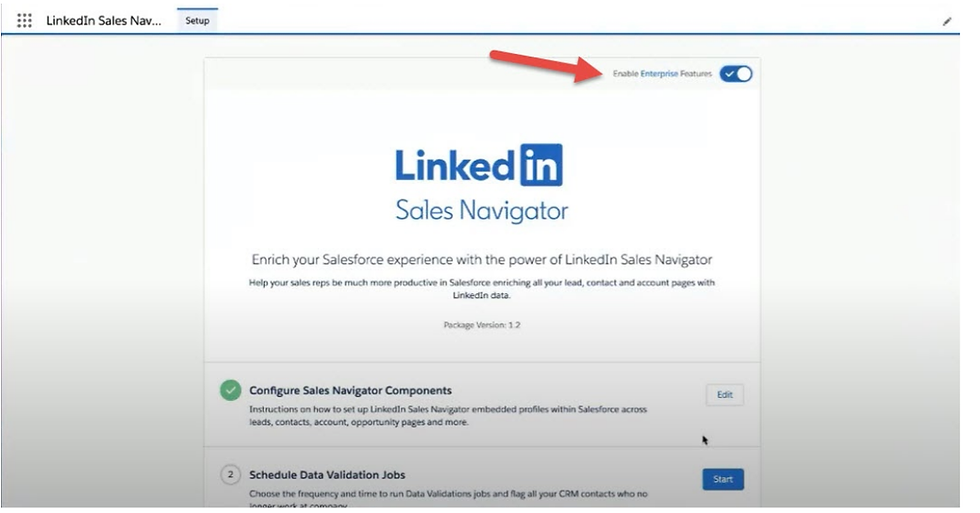
1. Open App Launcher by clicking the tile icon in the upper left corner.
2. Choose LinkedIn Sales Navigator Assistant from the drop-down menu.

3. Establish Sales Navigator Components according to the guide's instructions.
4. Quickly switch on Enable Enterprise Features in the upper right corner and follow the on-screen prompts to enable Data Validation.
Evaluation/Testing of the LinkedIn Sales Navigator App
To put the program to the test, go to:
1. After adding Sales Navigator embedded profiles to these page layouts, go to your Contacts homepage and choose any desired contact record.
2. Verify that the changes you've made to the pages are working and that the embedded profile is successfully added.
3. If you've added the Sales Navigator integrated profile to those pages as well, repeat Step 2 for Leads, Accounts, and Opportunities.
Notes:
If you don't see the changes you've made, try switching to a different browser and reopening the same contact record.
Unless the changes appear correctly in another browser, please click here to learn how to clear cookies and cache in your original browser to see the changes.
When it doesn't work, go back to setup and double-check that each layout was saved and activated.
Before you even open the app, you'll be asked to sign in with your LinkedIn account. After your initial login, you will not be required to use your LinkedIn account.
Upon executing the preceding procedures, go to the Sales Navigator Admin settings and enable the CRM Sync.
CRM Data transfer enhances the integration by enabling direct connecting between the platforms, auto-saving of critical Leads/Accounts, and writing-back of Sales Navigator Actions into your CRM, as well as ensuring that you're prepared for future capabilities that will necessitate sync.
We at Apphienz specialize in delivering personalized and customized services to our clients. Visit our website for more information and connect with us in case of any further queries and we will get back to you at our earliest.


Comments