
No Code Heroku And Salesforce Integration
- Mani Anand

- Jan 24, 2022
- 3 min read

Heroku enables organizations/developers to build, run, and operate applications entirely in the cloud using several different languages. Heroku is a fully managed PaaS, which means we don't have to worry about maintaining the infrastructure and layers and can instead focus on developing our applications. All of the underlying complexity is handled for you by dedicated Salesforce teams, including things like responding to failures, monitoring security vulnerabilities and patching them, planning for scaling, and scaling the PaaS itself.
Heroku handles these details for you, allowing you to focus on creating bespoke applications that delight your clients. You also have the extra benefit of being able to work in a number of languages and grow your resources as needed.
Why integrate Salesforce with Heroku?
Salesforce integration provides a better view of the data and the Sales pipeline
Salesforce's Data Replication and Data Proxy functionalities are provided through Heroku Connect.
Heroku Connect keeps the Salesforce API interactions separate from the Heroku application code.
Heroku Connect has an API that can automate processes like building, maintaining, and monitoring the Heroku Salesforce Integration's sync operations.
You may unload chosen data into the Heroku Postgres Database using the Heroku Salesforce Integration.
Step by Step process of Salesforce and Heroku Integration
Launch Heroku app
This will take you to the page where you may create a Heroku app. Enter a name for the app, choose "United States" as the default region, and then click "Deploy App."

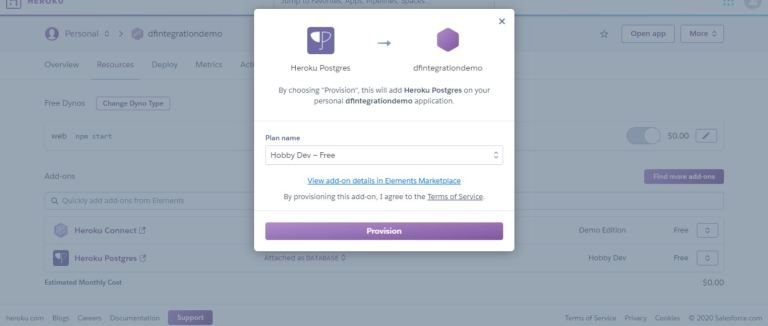
Add-ons
After you've finished building your app, you'll be sent to the Heroku Dashboard. On the dashboard, select the "Resources" option.

Type "Heroku Postgres" into the "Add ons" search box and provision(add) the resource to your project. Select the "Hobby Dev Free" plan as the default and click provision. Similarly, look for "Heroku Connect" and add it to your provisioning list.
Connect with Heroku
Heroku Connect makes it simple to create Heroku apps that interact with your Salesforce instance. Heroku Connect integrates the data in your Postgres database with the contacts, accounts, and other custom objects in the Salesforce database via bi-directional synchronization between Salesforce and Heroku Postgres.
After you've provisioned both resources, click the "Heroku Connect" add-on you just created.

Connect Salesforce and Heroku
It's past time to link our Salesforce org to our Heroku app.
You'll be taken to a screen where we'll need to set up our org connection after clicking on the Heroku Connect resource (which we just provided). Select "Setup Connection" from the drop-down menu.

You don't need to make any further adjustments; simply click next. you'll be approving a Developer Edition org, so you'll select production from the "Environment" selection and then click Authorize.

You may pick and alter the parameters from the environment list to authorize a Sandbox/Org with a custom domain. Salesforce's current Release will be used to pre-populate API versions. When you click the approve button, you'll be sent to your Salesforce org's login page. Click on login after entering your Salesforce org's credentials.
You'll be able to check the connection status once you've successfully authorized your org.

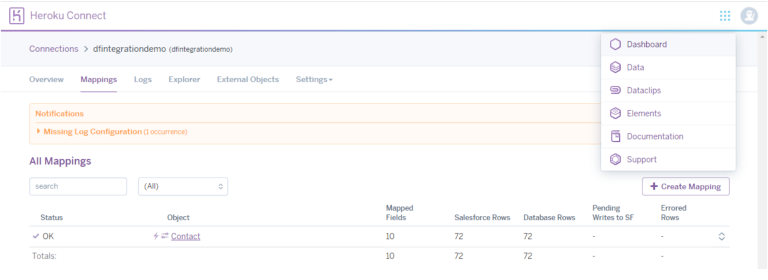
Make a Mapping
Then choose the Mappings tab. Then select "Create Mapping" from the drop-down menu.

This will connect your approved org to all of your Salesforce Objects.
In our example, we'll select the contact object, so type "Contact" into the search box and select the row. The next step for us is to choose the fields that will be polled into the database of our Heroku App. The first name, last name, mobile phone, phone, and email fields will be selected.

Check the option in the upper right corner that says "Accelerate Polling." Salesforce modifications are sent to Heroku in near real-time. Select the External Id c column and check the Write to Salesforce any modifications to your database box. We're now synchronizing both directions from Salesforce to our Heroku app and from Salesforce to Heroku app.

Create an external ID field in your contact if you don't already have one. Finally, in the top right, click the "Save" button.
This will begin polling data from Salesforce's "Contact" object to our Heroku app. It's time to try out our app!! From the launcher icon at the top, select the dashboard option and go to "Heroku Dashboard."
Test the App
Finally, click on "Open App" after clicking on your app's name.

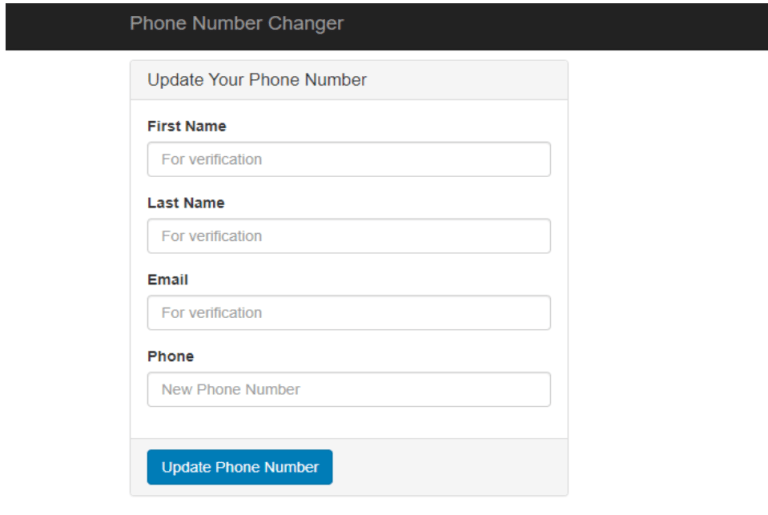
After you've filled in the data, click the "Update phone number" option to make changes to your contact record. Type in a contact name that matches one in your Salesforce org and then modifies/updates the phone number.
In this scenario, we'll change a contact's phone number to something else (see photos below):


We can see that the record information has changed to a new phone number after using the Heroku app to update the phone number.


Voila! We have successfully integrated Heroku with Salesforce.
If you are looking to integrate various apps and platforms to Salesforce to enhance productivity, get in touch with us today. We will assist you in the end-to-end integration process. Visit our website for more information. Write to us in case of any further queries. We make sure to get back to you at our earliest.


Comments